Coolify your Django project
12 min read
|
Jan 21 2025
Learn how to deploy a Django project with Coolify
What is Coolify?
Coolify is a tool that helps deploy web projects. It claims to be an open-source & self-hostable Heroku / Netlify / Vercel alternative.
I’ve been using it for a while with some Django projects (and other frameworks) and it has been a good experience. Some of them are up and runing like:
- Join the DJ - a platform for DJs to accept song requests;
- Streamliter - a platform to create streamlit apps entirely in the browser;
In this tutorial, I’ll show you how to deploy a Django project with coolify in your own VPS or virtual machine.
I’ll start by creating a new Django project with some opinionated choices. Then, I’ll show you how to deploy it with coolify.
If you just want to see the final result of the code, you can check out the django-coolify-tutorial repository.
Biggest drawback with coolify (in my opinion)
Although I’m a big fan of coolify, it’s not perfect. I have one major complaint:
It doesn’t come with an easy setup for zero downtime deployment using Docker.
This means if your project becomes large and it takes some time between the build and the deployment, the server can be down for some time.
There’s an open issue about this and it’s mentioned that it works if you use swarm mode.
If you must guarantee zero downtime and are not using swarm mode (like this tutorial), maybe consider using other solutions. Or maybe you found a way to do avoid downtime with coolify and docker - in that case, please share it with me (you can contact me on x or email).
Prerequisites
1. A VPS, a virtual machine or your own server.
You need to have some sort of server to run coolify in.
I recommend you rent a machine from Hetzner (it can be as low as $5/month).
It’s simple and cheap. Just follow along the instructions and ensure you can ssh into it.
Alternatively, you can use Digital Ocean, any other cloud provider or even your own self-hosted server.
2. Coolify installed in the server
The Coolify instalation instructions are pretty straightforward. You can follow them here.
By the end of the installation, you should have a coolify instance running in your server and accessible at http://<ip>:8000.
The Django project
For our Django project, we will use:
- whitenoise to serve static files;
- python-decouple to load environment variables;
- postgres as the database. We could just use sqlite, but I’ll show you how to use postgres to incorporate coolify’s database management;
- gunicorn as the web server.
You can use any other settings, but this is what I recommend for a quick start.
1. Install the dependencies
In a new directory, let’s start by creating a virtual environment and install the dependencies:
mkdir djproject
cd djproject
python -m venv .venv
source .venv/bin/activate
pip install django whitenoise python-decouple gunicorn psycopg2-binary dj-database-url
You should also create a requirements.txt file:
pip freeze > requirements.txtIf you prefer to use poetry, you can also do it like this:
mkdir djproject
cd djproject
poetry init
poetry add django whitenoise python-decouple gunicorn psycopg2-binary dj-database-url
In the next steps, I’ll include instruction/code for both options (poetry and pip).
2. Create the database
Locally, you can just use sqlite or have a postgres database running - the code will handle both cases. If you’re using sqlite, you can ignore this step.
If you wish to use postgres locally, you can create a new database with the following commands (assuming you’re using the default postgres user):
sudo -u postgres psql
CREATE DATABASE djproject;
the resulting database url should look like this:
postgres://postgres:postgres@localhost:5432/djprojectDepending on your setup, you might need to change the user, password or the port number. save this variable to use it later.
3. Create the Django project
Let’s create a new Django project called djproject (inside the already created djproject directory):
django-admin startproject djproject .You should have the following structure:
djproject/ # root directory
    manage.py
    djproject/
        __init__.py
        asgi.py
        settings.py
        urls.py
        wsgi.py
    requirements.txt # or pyproject.toml, pyproject.lock, etc
4. Configure the Django project
We can now load environment variables with python-decouple and edit the djproject/settings.py file.
You can check the final settings file here.
4.1 - Imports
In the top of the djproject/settings.py file, add the following imports:
# djproject/settings.py
from decouple import config
import dj_database_url
4.2 - Load the environment variables
Let’s add some settings to load the environment variables:
# djproject/settings.py

SECRET_KEY = config('SECRET_KEY', default='django-insecure-siqce7e*%*426p$)2hxgk0u-b11vht*fiz_mj+6z4=tbnn7la3')

DEBUG = config('DEBUG', default=True, cast=bool)

ALLOWED_HOSTS = config('ALLOWED_HOSTS', default='localhost,127.0.0.1', cast=lambda x: [i.strip() for i in x.split(',')])

CSRF_TRUSTED_ORIGINS = config('CSRF_TRUSTED_ORIGINS', default='http://localhost:8000,http://127.0.0.1:8000', cast=lambda x: [i.strip() for i in x.split(',')])- The
SECRET_KEYis a random string used by Django to secure the sessions. locally, we can use the default value but we will generate a new one in production. - The
DEBUGis set toTrueby default, which is what we want for development. In production, we will set it toFalse. - The
ALLOWED_HOSTSis a list of hosts that the server will accept connections from. In development, we will set it tolocalhost,127.0.0.1. In production, we will set it to the domain name of the server. - The
CSRF_TRUSTED_ORIGINSis a list of origins that the server will accept CSRF requests from. In development, we will set it tohttp://localhost:8000,http://127.0.0.1:8000. In production, we will set it to the domain name of the server (with the http protocol).
4.3 - Configure the database
Let’s add the following settings to configure the database:
# djproject/settings.py
DATABASES = {
    "default": dj_database_url.config(
        default=config("DATABASE_URL", f"sqlite:///{BASE_DIR}/db.sqlite3"),
        conn_max_age=600,
        ssl_require=False,
    ),
}
We are using the dj_database_url library to parse the DATABASE_URL environment variable and configure the database.
4.4 - Configure static files and whitenoise
Let’s also add STATIC_ROOT to the settings.py file, so we can collect static files in production:
STATIC_ROOT = BASE_DIR / 'staticfiles'We will also add the whitenoise middleware to the settings.py file, so we can serve static files in production:
# djproject/settings.py

MIDDLEWARE = [
    ... # other middlewares
    'whitenoise.middleware.WhiteNoiseMiddleware',
]
4.5 - Configure template settings
Let’s also add the following settings to the settings.py file, so we can add templates in the templates directory:
# djproject/settings.py
TEMPLATES = [
    {
        ... # other settings
        'DIRS': [BASE_DIR / 'templates'],
        ... # other settings
    },
]
4.6 - Create the .env file
To match the settings changes, we can now create a .env file locally with the following content:
# .env - local development environment variables


SECRET_KEY=django-insecure-siqce7e*%*426p$)2hxg7la3
DEBUG=True
ALLOWED_HOSTS=localhost,127.0.0.1
CSRF_TRUSTED_ORIGINS=http://localhost:8000,http://127.0.0.1:8000

# database url - you can leave it empty if you're using sqlite
DATABASE_URL=postgres://postgres:postgres@localhost:5432/djproject
5. Create a home page
We will also create a home page in the templates/index.html file, so we can test if everything is working.
<h1>Hello, World!</h1>In our demo project, we are using a more rich layout using mvp.css, but it’s just to look nice, it’s not really necessary to follow along this tutorial.
We will also create a djproject/views.py file for the home view:
# djproject/views.py
from django.shortcuts import render

def index(request):
    return render(request, 'index.html')
and add the following to the djproject/urls.py file:
# djproject/urls.py
from django.contrib import admin
from django.urls import path
from . import views

urlpatterns = [
    path('admin/', admin.site.urls),
    path('', views.index, name='index'),
]
6. Apply migrations and run the Django project
Let’s apply the migrations and run the Django project:
python manage.py migrate
python manage.py runserver
You should now be able to access the home page at http://localhost:8000 and the admin interface at http://localhost:8000/admin.
7. Add docker
To deploy the Django project with coolify, we need to add a docker file and a docker compose file. We will also add and entrypoint script to run the Django project.
7.1. Create the docker file
Let’s create a Dockerfile file with the following content:
# Dockerfile
FROM python:3.12-slim-bookworm

ENV PYTHONDONTWRITEBYTECODE=1
ENV PYTHONUNBUFFERED=1

RUN apt-get update && apt-get install -y \
    libpq-dev \
    gcc \
    && rm -rf /var/lib/apt/lists/*

RUN mkdir -p /code

WORKDIR /code

# If you want to use poetry
RUN pip install poetry
COPY pyproject.toml poetry.lock /code/
RUN poetry config virtualenvs.create false
RUN poetry install --only main --no-root --no-interaction

# If you want to use pip
COPY requirements.txt /code/
RUN pip install -r requirements.txt

COPY . /code

RUN python manage.py collectstatic --noinput

RUN chmod +x /code/entrypoint.sh
In this Dockerfile, we install the dependencies, collect static files and make the entrypoint script executable (you should choose between poetry or pip to install the dependencies).
7.2. Create the entrypoint script
Let’s create an entrypoint.sh file with the following content:
# entrypoint.sh
#!/bin/sh

until cd /code
do
    echo "Waiting for server volume..."
done


until python manage.py migrate
do
    echo "Waiting for db to be ready..."
    sleep 2
done


gunicorn --bind :8000 --workers 2 djproject.wsgi
This script does the following:
- Waits for the server volume to be ready;
- Waits for the database to be ready;
- Runs the Django server with gunicorn.
7.3. Create the docker compose file
Let’s create a docker-compose.yml file with the following content:
# docker-compose.yml
version: '3'

services:
    server:
        container_name: djproject
        restart: unless-stopped
        build:
            context: .
            dockerfile: ./Dockerfile
        entrypoint: /code/entrypoint.sh
        volumes:
            - static_volume:/code/staticfiles
        expose:
            - 8000
        environment:
            DEBUG: "False"
            SECRET_KEY: ${SECRET_KEY}
            ALLOWED_HOSTS: ${ALLOWED_HOSTS}
            CSRF_TRUSTED_ORIGINS: ${CSRF_TRUSTED_ORIGINS}
            DATABASE_URL: ${DATABASE_URL}

volumes:
    static_volume: {}
This docker compose file will build the docker image, run the entrypoint script and expose the server on port 8000. It also loads the relevant environment variables - we will configure coolify to pass the relevant environment variables to the server.
Deploying the Django project with coolify
Now that we have a Django project running locally, we can deploy it with coolify.
1. Push the code to github/gitlab/bitbucket/etc…
Let’s start by pushing the code to github (or any other git provider), so we can access it from coolify.
git init
git add .
git commit -m "Initial commit"
git branch -M main
git remote add origin https://github.com/your-username/your-repo.git
git push -u origin main
In this tutorial, we are using the django-coolify-tutorial repository as an example.
2. Create a new coolify project
Assuming your coolify instance is running at http://<ip>:8000, you can now create a new coolify project by going to http://<ip>:8000/projects
and clicking on the New button in the top right corner. Give it a name and description and click on the Continue button.

You should now see the default production environment. If you click on it, you will see an + Add new resource button. Click on it.
3. Create a postgres database
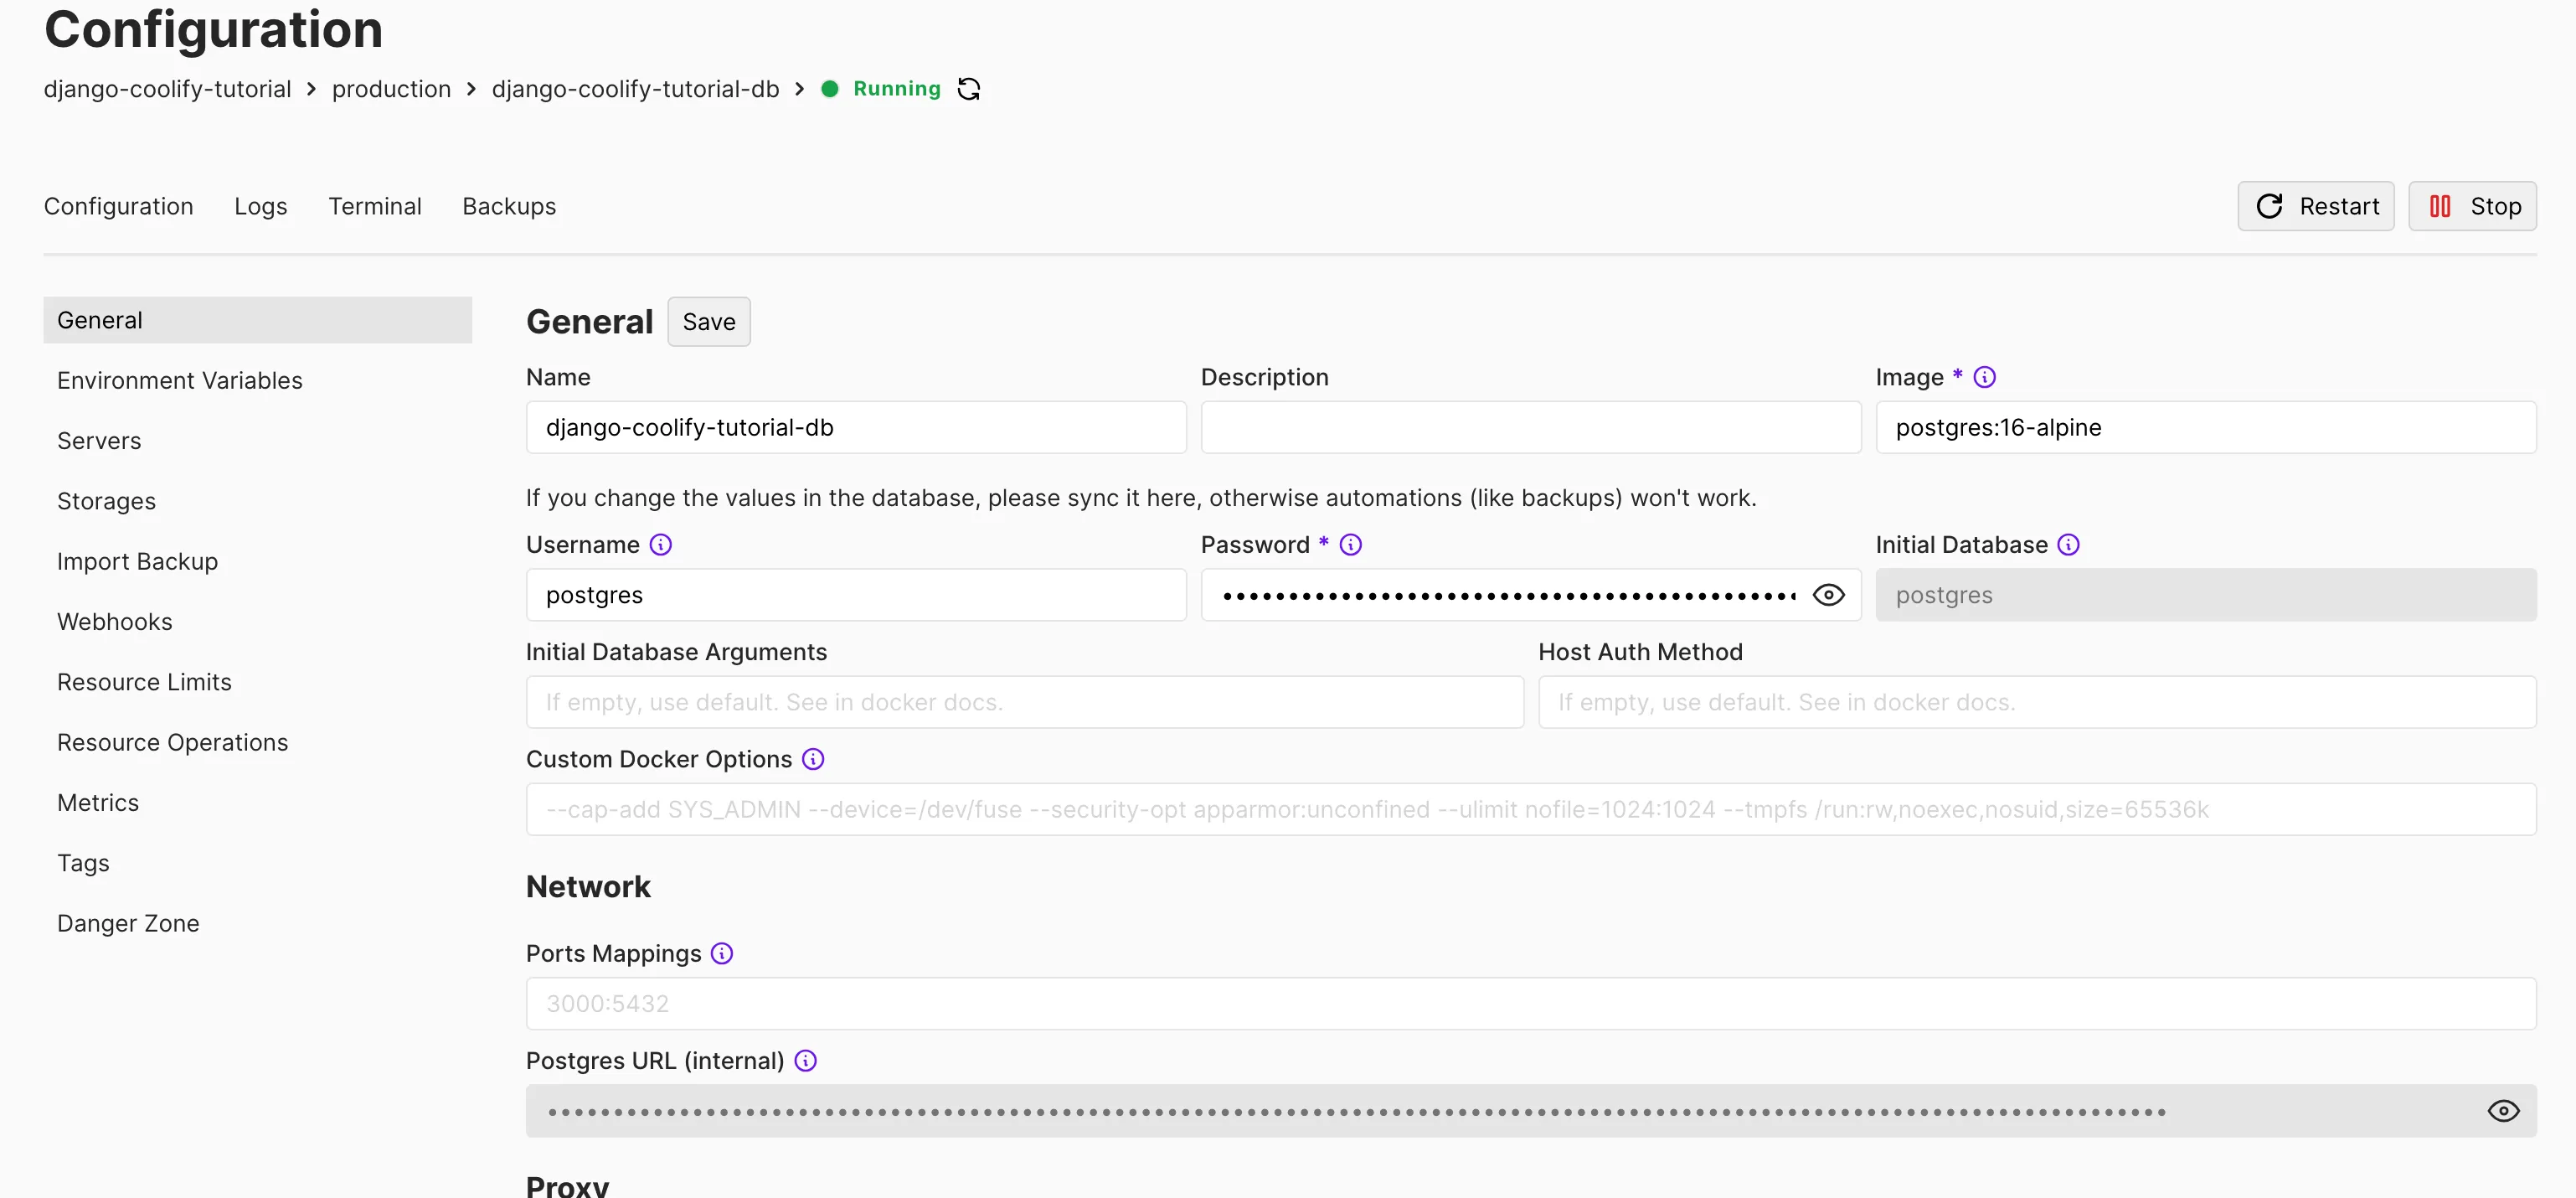
We can use the postgresql resource to create a postgres database directly in coolify. For this tutorial, we will use the default PostgreSQL 16.
- click on the
PostgreSQLbutton; - choose the
PostgreSQL 16 (default)version; - edit whatever settings you want and click on the
Savebutton. In this tutorial, we will mostly use the default settings and just change the name of the resource; - click on the
Startbutton to create the database; - After all this, copy the
Postgres URL (internal)value and save it somewhere temporary - this will be used to connect the server to the database; It’s important to only copy this value in the last step, so we avoid copying outdated values. The URL will look something like this:
postgres://postgres:e1646815-c08e-4814-b66f-b1d0646fec36@87a33fe-8a8b-425a-9db5-5d7b913d763:5432/postgresYour configuration should look something like this:
4. Connect the github repository
Going back to the production project page (in https://coolify.fmacedo.com/project/<PROJECT_ID>/production), click on the + New button.
Let’s add our code repository. You can choose between a private or public repository.
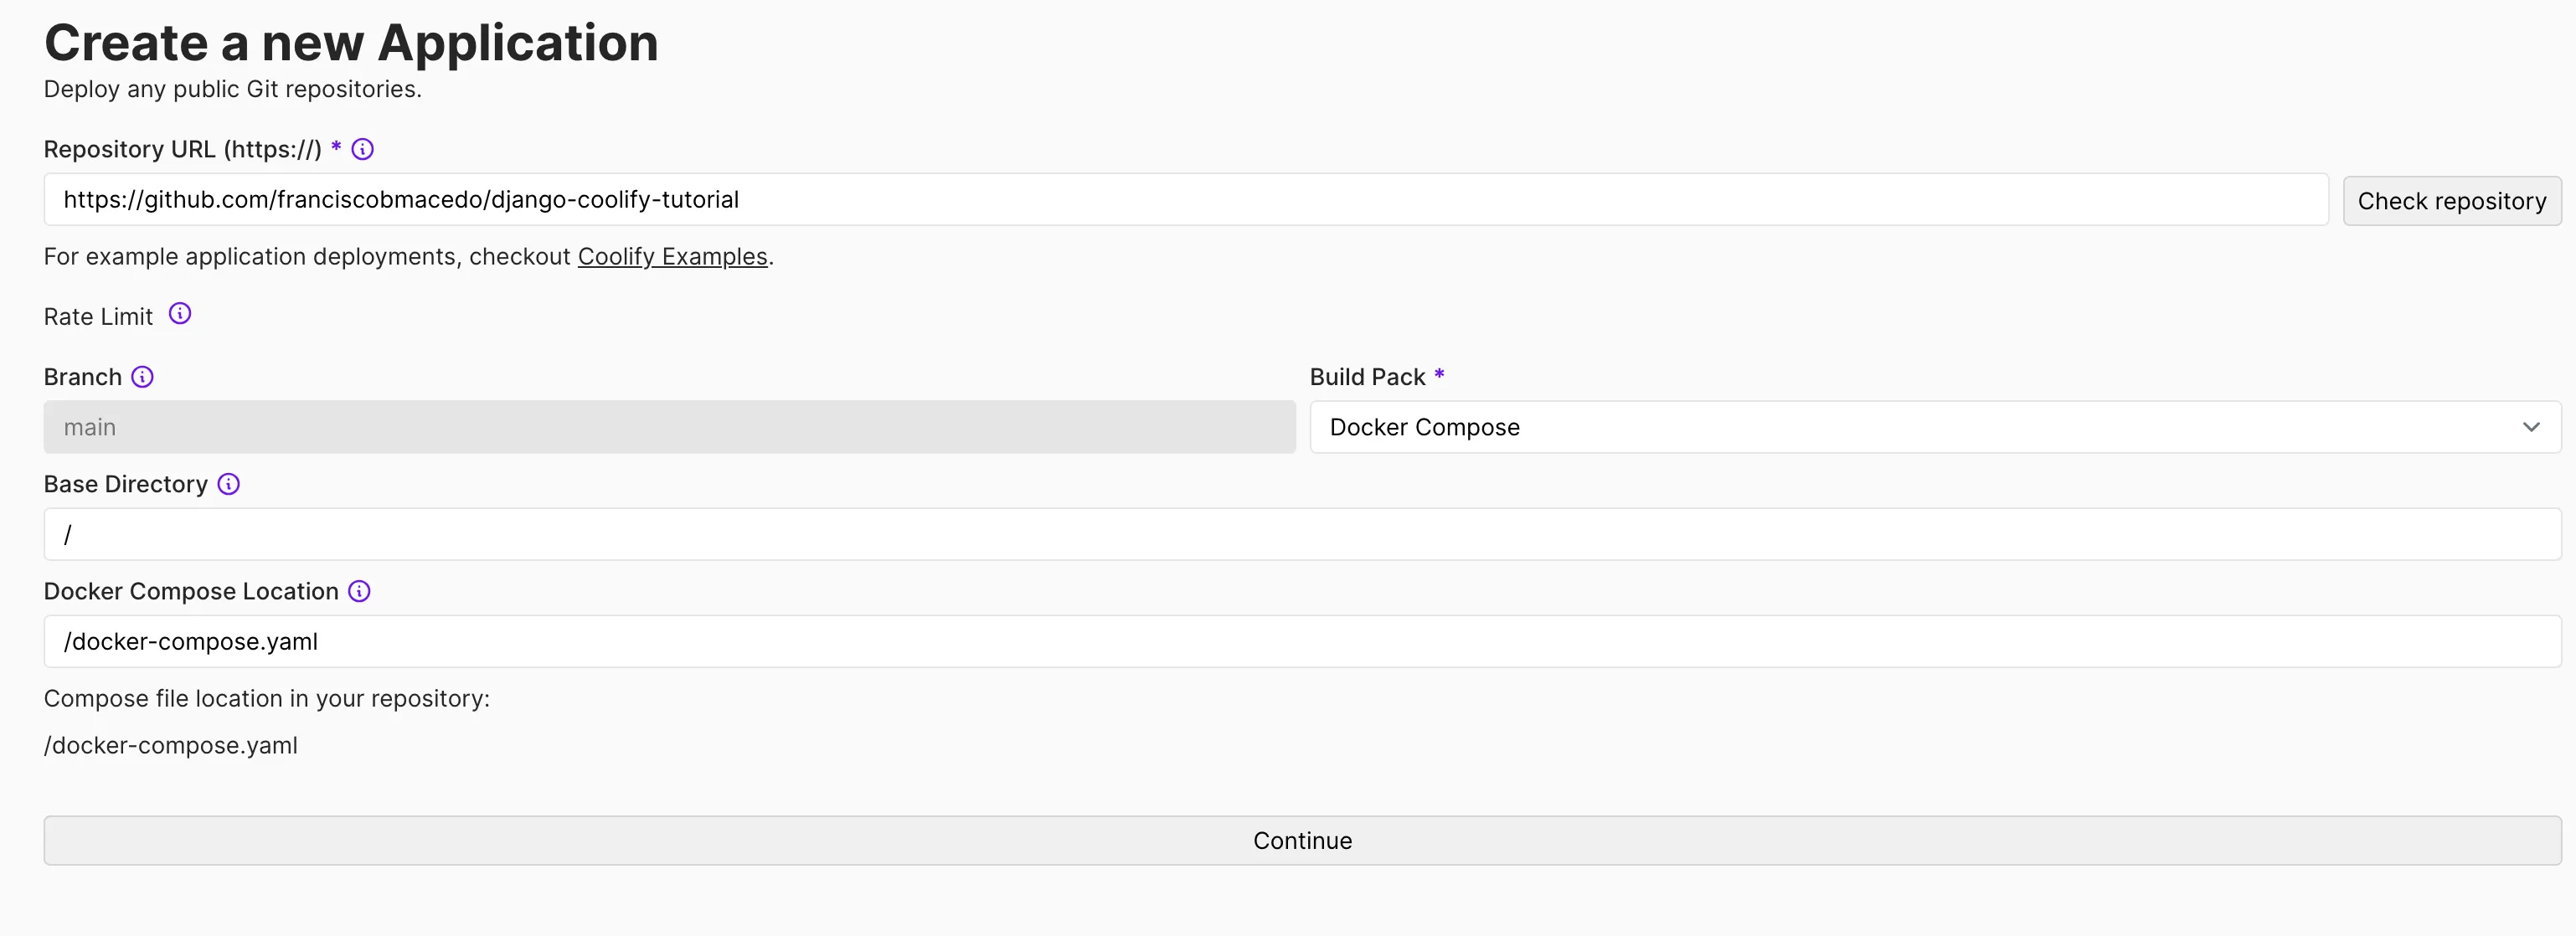
In this case, since we are using a public repository, we can just click on the Public repository button, paste the repository url and click on the Check repository button.
We can now select the branch we want to deploy and choose docker as the deployment method. Your choices should look somehing like this:
You can now press Continue and start configuring your project.
5. Configuring the project
We will go through the most relevant steps in the coolify Application page.
5.1. General tab
In the General tab, the one that should be active when you click on the Continue button of the previous step, you can:
- Set the project name to
django-coolify-tutorial-appor whatever you want; - Generate a new domain or set your own domain - if you generate a new one, coolify will create something like
http://pw8css18cfctg8shhwjw3cww.5.74.172.122.sslip.io; - Copy this domain - this will be used in the environment variables;
5.2. Environment variables tab
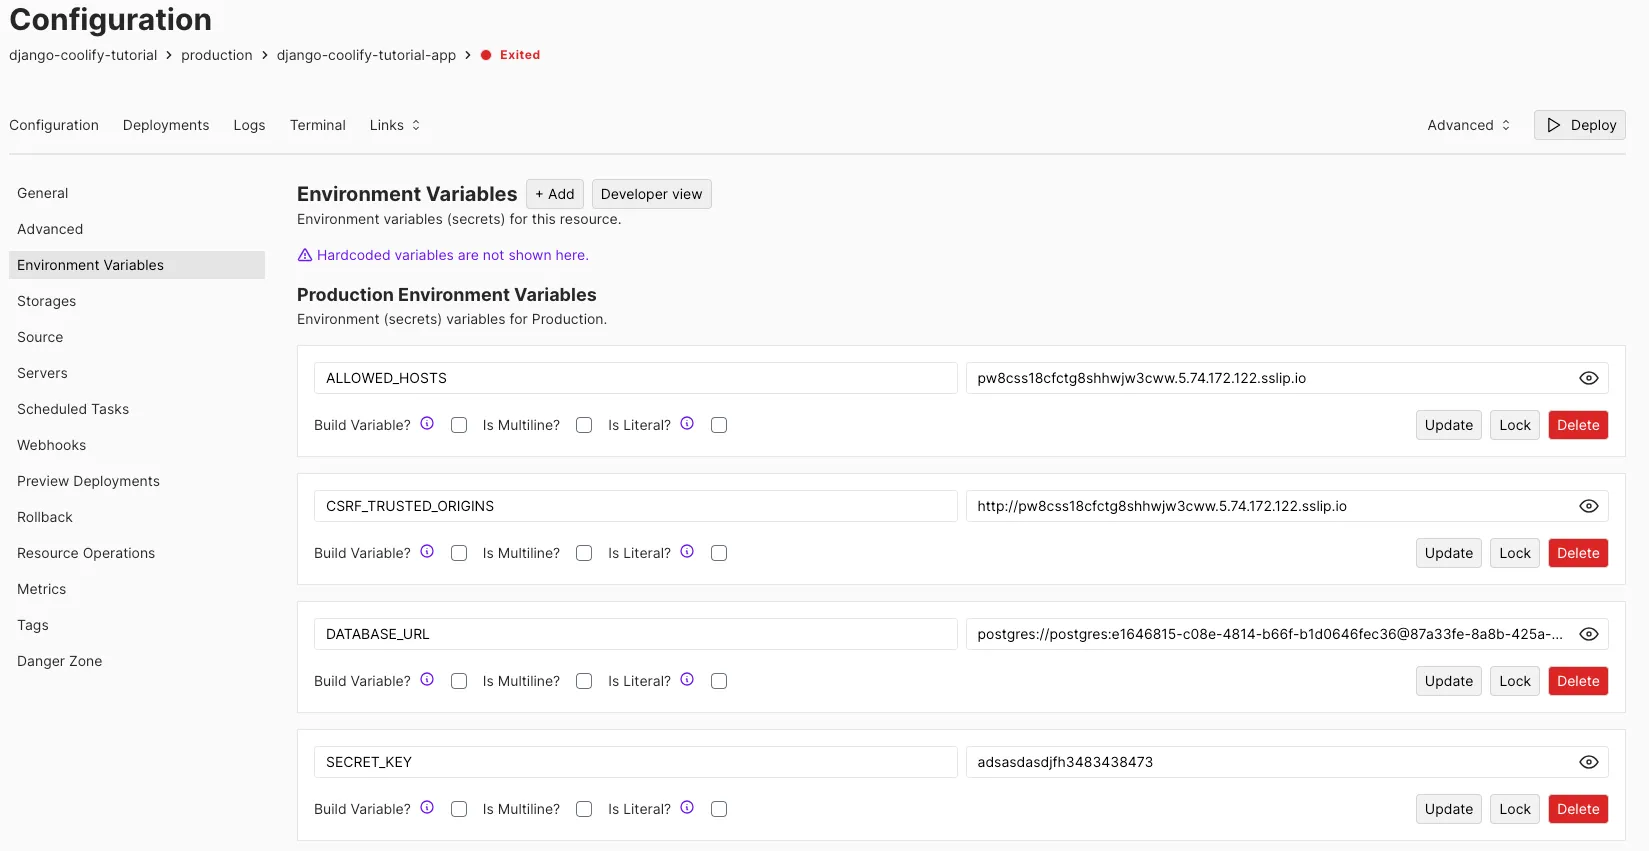
In the Environment variables tab, you can set the environment variables to the relevant values.
As you can see, coolify already set the variable names with default empty values based on the docker compose file.
- Set
ALLOWED_HOSTSvariable to the domain you copied without the protocol (e.g.pw8css18cfctg8shhwjw3cww.5.74.172.122.sslip.io); - Set
CSRF_TRUSTED_ORIGINSvariable to the domain you copied with the protocol (e.g.http://pw8css18cfctg8shhwjw3cww.5.74.172.122.sslip.io); - Set the
DATABASE_URLvariable to the postgres url you copied (e.g.postgres://postgres:e1646815-c08e-4814-b66f-b1d0646fec36@87a33fe-8a8b-425a-9db5-5d7b913d763:5432/postgres); - Set the
SECRET_KEYto some generated new value. To generate one using Django:
python -c 'from django.core.management.utils import get_random_secret_key; print(get_random_secret_key())'Your environment variables should look something like this:
Remember to click on the Update button of each variable to save the changes.
5.3. Advanced tab
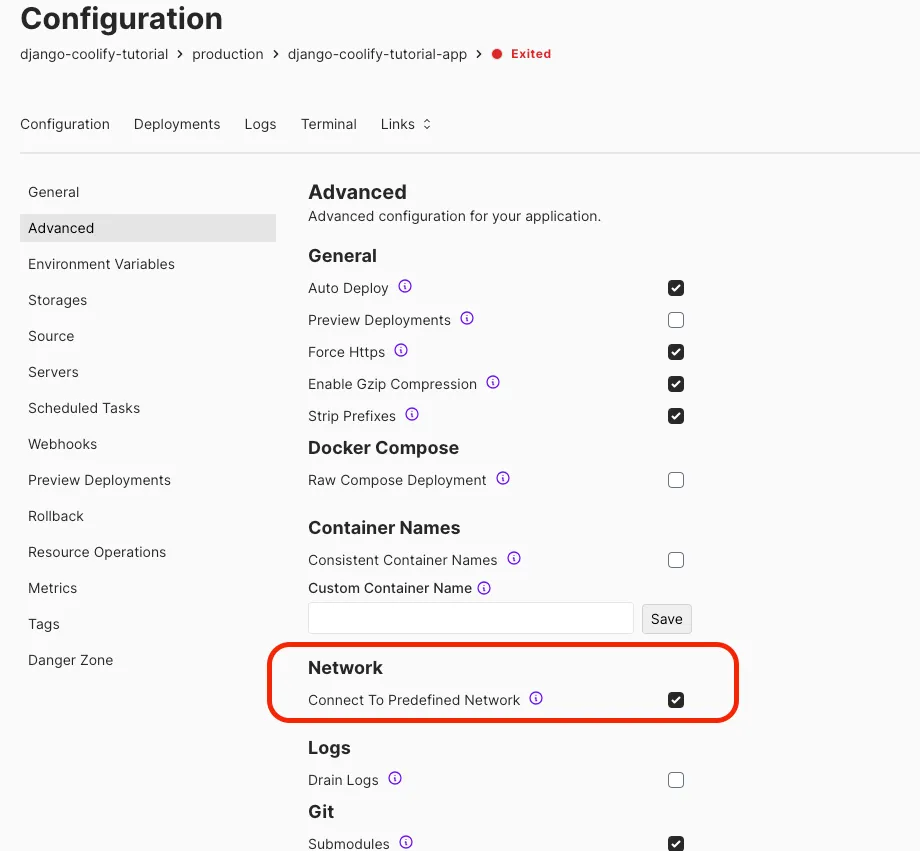
In the Advanced tab, we need to check the Connect To Predefined Network setting so that our postgres database is accessible from the server.
If you don’t do this, you will have to manually set the postgres host to the server IP address and configure port mapping in the postgres resource settings.
Your advanced settings should look something like this:
6. Deploying the project
We are now ready to deploy the project. On the top right corner of the page, click on the Deploy button.
After a few seconds, the project should be deployed and you should be able to access it at the domain you chose.
If you want to create a super user to test the admin interface, you can jump over to the terminal tab and run the django superuser command:
python manage.py createsuperuserYou should now be able to access the admin interface at something like http://pw8cgs88ckcog8swswgw0cww.5.74.172.122.sslip.io/admin.
Everytime you push a new commit to the main branch, coolify will automatically deploy the project. To configure this setup further, check out the coolify documentation.
Conclusion
In this tutorial, we learned how to deploy a Django project with coolify. We also learned how to use coolify’s database management to create a postgres database and connect it to the server.
If you have any questions, feel free to ask me on x or email.
Thanks for reading!